Selenium WebDriver, Maven...
Thanks for your tremendous response on Part-1. I will be explaining right from root level, so even if you don't have knowledge, no problem, you will learn. Guaranteed!! Do comment me below incase I miss to explain anything or more explanation is required.
Now we will be working on one of the most important topic in Automation viz.,
‘Selenium’.
On a whole, Selenium suite consist of below tools:
-Selenium IDE[Integrated Development Environment]: A record
and playback tool. It is also a distributed Firefox plugin.
-Selenium RC[Remote Control]: Allows to create a script in
desired programming language and allows executing test-scripts in large
spectrum of browsers.
-Selenium WebDriver: Has various advantages over Selenium
RC. Here WebDriver directly communicates with browser and uses its native
compatibility to automate[don’t get terrified with biblical definition, I will
make it easy in further explanation]
-Selenium Grid: Used to distribute your test execution on
multiple platforms and environments concurrently.
Out of above last two are important and we will be digging
deep now into Selenium WebDriver.
Lets first understand what happens to the code that we write
and what is behind the picture scenario, called Selenium WebDriver
Architecture. When we trigger a test, the complete selenium code[whatever you
have written] gets converted into a JSON format and transferred over using HTTP
protocol. This generated JSON is sent to browser driver, each browser has its
own browser driver[like Chrome- Chrome BrowserDriver, IE- IE BrowserDriver, Firefox-
Firefox BrowserDriver etc ].
Now BrowserDriver communicates with respective browser and
executes the command by interpreting JSON received on browser. BrowserDriver now receives response from
browser and sends the response back in JSON format.
You can find this image anywhere over the internet:

Simple isn’t it? Now let’s understand further:
What Selenium can automate? Selenium can only automate web-based applications.
Now what are web-based applications? Simplest answer would be, applications made using ‘html tags’ are called web-based applications.
How would you know whether an application is made using html tags? Just right-click on the page, click 'View page source' and do ‘ctrl+f’ and search ‘html’, if you find something like ‘

I did right-click->View page source->ctrl-f->html:
Found ‘html’ and got the answer, its a web-based page and I can firmly automate
this page as per our earlier explanation.

Consider you are testing this page as a manual test-case scenario:

To achieve this test-case execution, you will follow above
steps and check when you type word ‘selenium’ in Google search-box, it should
display various options Google provides as per its search criteria like below:

Done, your manual test-case execution passed. But what if you have to achieve this using automation. Don’t
worry, nothing is difficult. It is just that whenever you try something new, since you are unknown to it, you will find it difficult. Just like learning to ride
the cycle for first time, once you know, it is super-simple. Trust me.
We will achieve this in 3 stages:
1. Stage-1: Get the required software’s for automating.
2. Stage-2: Understanding the various terms like[locators, tagname,
findElement etc..etc]
3. Stage-3: Stage-1+Stage-2= Stage-3
Stage-1: So let’s install required software's and nosedive in achieving this simple test
case automation:
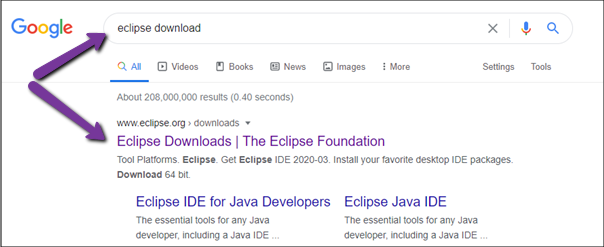
- Open Eclipse[an editor which will help in
writing code]. If you don’t have, download using Google, just search simple
words ‘eclipse download’

- Open the first link that you get, whatever version of eclipse you get no problem, whether Helios, Neon etc..etc.. Click on ’64-bit download’[choose Eclipse IDE for java Developers, in case it ask for]. Once download is done, go to the location where it is downloaded. Unzip, double click[which has eclipse logo on it] on the downloaded ‘.exe’ file.
-
Select the location for the project and click ‘Launch’ click next->next and finish the installation. Java is compulsory for eclipse, in-case it ask for Java, provide the path of your Java which you installed in ‘Part-1’. [Click on close icon, only on the ‘Welcome’ page.]
- Now as your eclipse is open you are already into an development environment, where you can start writing and executing any of your code. In order to achieve automation of above test-case we can do it in two ways:
- Using sample small code patches and demonstrate success, but again you need to reinvent the wheel, to add these patches right from start for integrating them into framework.
- Directly work on bigger picture and start using above framework components, it will give clear and bigger view of problems-solutions and better understanding.
5. For example you want to create project based on
first way mentioned just above, then you need to follow below: [don’t try creating
this, just read and go through]
- Click ‘File->New->Java Project’

- Enter project name as ‘GoogleSearch’[you can enter any name] in ‘Create a Java Project’ and click ‘Finish’.

- Once done it will look like below:

- Now this is your project name ‘GoogleSearch’, click on the small arrow on the left of project inside the ‘Package Explorer’

- You will find ‘JRE System Library’[contains default java libraries] and ‘src’[your code folder]. Right-click on ‘src’ folder->New->Class:

- Enter name of the class as ‘TestGoogleSearch’ and check the box ‘public static void main(String args[])’:

You must be having a question, what is this checkbox
‘public static void main(String[] args)? For now just consider, when you start
running in a race, there is a certain valid start-point from where you start
running, similarly java starts executing from this point. And when you click
‘Finish’ the Eclipse editor creates a pre-defined code as below and also just have a look at the folder structure created at the left:

So if I have to add any class files I have to repeat
above procedure to create class file or folders. Now when you work in teams,
you cannot assure how your team-member would create files/folder from his end and can lead
to lot of confusion. It can create issue when we try to merge code or share
code, as we might further need to download certain ‘jars’[Java Archive, for now understand it as library of code bunched into one,
acting as helper files, For example a bicycle bell, which is made up of so many
things but packed and presented as one small instrument called ‘bell’ which
help in solving our problem of cycling in traffic
]. So when we share code then we need to make sure even these jars need
to be shared appropriately or can lead to unknown errors.
- In order to avoid such shabby structure and complexity, we need to come up with a standard, so that all team-members can follow the same. So here we will introduce ‘Maven’. Many people start with showing execution on sample code in bits and pieces, though you learn that patch of concept, but no one shows how to integrate that patch to your main framework, and your remain lost on each small patches. Just follow, I will show every part and I guarantee you will be happy of the outcome, that you learned.
- So what is Maven?: Maven is Software Project Management and Build Management Tool[highly recommended and used tool almost across all organisations]
Maven acts as:
1.Central Repository to get dependencies[ like no need to download jars]
2.Maintaining common structure across the organisation[all members default share
same structure]
3.Flexibility in integrating with CI Tools[like Jenkins]
You will soon understand the magic Maven creates:
Go to google and punch these simple search words ‘Maven download’

Click on this link[Binary zip archive], download, unzip:

Calm down and take a break here...
Continued in next release..Part-3: Maven configuration and Projectcreation[it’s a child’s play, don’t worry]
Click below links for releases till now:
Did she really loved me....? Part-1
Did she really loved me....? Part-2
Did she really loved me....? Part-3
Did she really loved me....? Part-4
Did she really loved me....? Part-5
Did she really loved me....? Part-6
Did she really loved me....? Part-7
Did she really loved me....? Part-8
Did she really loved me....? Part-9
Did she really loved me....? Part-10
Did she really loved me....? Part-11
Did she really loved me....? Part-12
Did she really loved me....? Part-13
Did she really loved me....? Part-14
Did she really loved me....? Part-15[The End]
Want to own your own start-up? Want to be Richie Rich?
Hey Corona, you should go now!!
Part-1: Want to quickly become an Selenium Automation Engineer and build framework right from scratch?
Part-2:Want to quickly become an Selenium Automation Engineer and build framework right from scratch?
Part-3:Want to quickly become an Selenium Automation Engineer and build framework right from scratch?
Part-4: Want to quickly become an Selenium Automation Engineer and build framework right from scratch?


No comments:
Post a Comment