Maven configuration and Project creation...
Hello everyone, further continuing our discussion from Part-1 and Part-2, we will be configuring Maven now and creating our project structure. Go to the location where you have downloaded and unzipped your Maven, for me, it is ‘C:\Software\apache-maven-3.6.3-bin\apache-maven-3.6.3’

Now again as mentioned in Part-1 go back to your environment
variables, just right click 'My Computer' and select and navigate to
'Properties->Advanced System Settings->Environment Variables'. Click on
New and add the Maven path under MAVEN_HOME as mentioned below:


Now again in the same directory move to folder bin,ie for me ‘C:\Software\apache-maven-3.6.3-bin\apache-maven-3.6.3\bin’
and paste this path in the Environment variable called Path as mentioned below,
by clicking Edit > New[paste the path] > OK > OK


This way, your Maven Configuration is complete, Simple isn’t
it. Now check whether your Maven is configured properly. Go to Command Prompt
and type command ‘mvn –version’, it should show below output:

See Maven is a magic tool, it will help you to have a
standard project structure[folder structure] across the team or organization.
It helps you to resolve or get whatever dependencies your project needs immediately without any hassles[you will see this soon].
Now, let's start creating a project using Maven for better
understanding. You can do this in 2 ways:
- Use eclipse and create Maven Project, done simple[but here you will not know inner basic what eclipse did to create the project, and you won't have an explanation if someone asks you inner details]
- Use Command-line one simple command to create the project and export this created project using Eclipse[here you will understand every aspect of project structure and then just import this project in Eclipse]
So we will use command line command to
create a project, use below simple command:
a.
Go to a location where you want your Maven
project to be created, for me I created a directory at location ‘C:\Sanjay\Blog\Automation\Maven\MavenProject’
b.
Using command prompt, go to that location and
type ‘dir’, just to confirm your location, where you want to create the project and
fire below command and hit enter:
'mvn archetype:generate -DgroupId=testSearch -DartifactId=GoogleSearchTest
-DarchetypeArtifactId=maven-archetype-quickstart -DinteractiveMode=false'
Note: Here,
'-DgroupId=testSearch' -- You specify package name of your
project as ‘testSearch’
‘-DartifactId=GoogleSearchTest’
-- You specify the name of your project as ‘GoogleSearchTest’
[If required you can find more details on official Maven Documentation page: https://maven.apache.org/guides/getting-started/maven-in-five-minutes.html
or https://maven.apache.org/archetype/maven-archetype-plugin/generate-mojo.html
]

After a while you will see below:

As you can see, it shows as ‘BUILD SUCESS’.
Now go to the location where you chose to create your maven project, ie ‘C:\Sanjay\Blog\Automation\Maven\MavenProject’
and check whether ‘GoogleSearchTest’ project is created or not as mentioned in
above screenshot.

So now we have successfully created the
project using command prompt, now what remains is exporting it to Eclipse.
Export Maven project to Eclipse:
1.
Go to the location where you created your maven
project ie for me it is: ‘C:\Sanjay\Blog\Automation\Maven\MavenProject’
2.
Here you find your project which you created
using command line ie ‘GoogleSearchTest’
3.
Navigate inside this folder and you should be
able to see a file called ‘pom.xml’ like below:

4.
pom.xml is the heart of any maven project[soon
you will understand how]. Note the location of the pom.xml, for me, it is: ‘C:\Sanjay\Blog\Automation\Maven\MavenProject\GoogleSearchTest’
5.
Navigate to this location using command prompt
and fire command ‘mvn eclipse:eclipse’ , what this command basically does is,
it integrates maven with eclipse by downloading required components.


6.
Once hitting enter after command ‘mvn
eclipse:eclipse’ you will see above at the last ie ‘BUILD SUCCESS’.
7.
Now you are all set to export your project to
eclipse. Go to eclipse and navigate to File>Import>Other>Maven>Existing
Maven Project>Next


8.
Select the Maven Project that we created using
command prompt ie ‘GoogleSearchTest’ and click Next

9.
And Click Finish


10.
Hurray, you can see your project now in Eclipse,
with all the required standard folder structure


This is one of the most verbose way to create a Maven
project, and now you completely know every step, what is Project name, what is
package name, how eclipse deals with it.
The comparison between project created in Part-2 and one created in Part-3 will show how clean project structure we get with Maven, which is not possible using normal project creation:
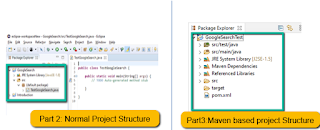
The comparison between project created in Part-2 and one created in Part-3 will show how clean project structure we get with Maven, which is not possible using normal project creation:

In the next article, ie Part-4, we will look into Selenium WebDriver and
start working on core automation and start adding our bits to it.
Thanks for reading!!
For earlier articles click below link:
Part-1:Want to quickly become an Selenium Automation Engineer and build framework right from scratch?
Part-2:Want to quickly become an Selenium Automation Engineer and build framework right from scratch?
Part-3:Want to quickly become an Selenium Automation Engineer and build framework right from scratch?
Part-4: Want to quickly become an Selenium Automation Engineer and build framework right from scratch?
Tasveer: Lisa Ray....!
Thanks for reading!!
For earlier articles click below link:
Part-1:Want to quickly become an Selenium Automation Engineer and build framework right from scratch?
Part-2:Want to quickly become an Selenium Automation Engineer and build framework right from scratch?
Part-3:Want to quickly become an Selenium Automation Engineer and build framework right from scratch?
Part-4: Want to quickly become an Selenium Automation Engineer and build framework right from scratch?
Did she really loved me....? Part-1
Did she really loved me....? Part-2
Did she really loved me....? Part-3
Did she really loved me....? Part-4
Did she really loved me....? Part-5
Did she really loved me....? Part-6
Did she really loved me....? Part-7
Did she really loved me....? Part-8
Did she really loved me....? Part-9
Did she really loved me....? Part-10
Did she really loved me....? Part-11
Did she really loved me....? Part-12
Did she really loved me....? Part-13
Did she really loved me....? Part-14
Did she really loved me....? Part-15[The End]
Want to own your own start-up? Want to be Richie Rich?
Hey Corona, you should go now!!
Part-1: Want Quick Divorce? Come in...: [Kahani Ghar-Ghar ki]
Part-2: Want Quick Divorce? Come in...[Kahani Ghar Ghar ki]


No comments:
Post a Comment